Share this
How to Create a Custom DateTime Property in HubSpot
by Lauren Ryan on October 2023
Custom properties in HubSpot are used to track a variety of activities. Users use the date property type frequently to track when certain events occurred. This data is then used in reporting, personalization, and more throughout HubSpot.
But what if you want to create a custom property to store an event's date and time? As of today, you can’t create a datetime property directly in HubSpot.
But don’t worry. Any HubSpot Super Admin can create a custom datetime property in HubSpot. We just have to get a little creative.
3 Steps to Create a Custom DateTime Property in HubSpot
Here’s what you need to create a custom datetime property in HubSpot:
- Property information (name, label, property group, object)
- Private app access token from a HubSpot Private App (requires HubSpot Super Admin access)
- HubSpot API Docs for CRM Properties
Required Property Information for a Custom DateTime Property in HubSpot
Six pieces of data are needed to create a custom datetime property using the HubSpot API Docs for CRM Properties. Here’s how to gather that data before going to create the custom datetime property.
Data needed for a custom datetime property in HubSpot:
- Name - The internal property name is used when referencing the property via the API.
- Label - A human-readable property label that will be shown in HubSpot.
- Type - The data type of the property.
- Field Type - Controls how the property appears in HubSpot.
- Group Name - The name of the property group the property belongs to.
- Object Type - The HubSpot object this property belongs to.
Let’s demonstrate how to find these pieces of data using an example.
Use Case: As the system administrator, I need to create a custom datetime property in HubSpot to store the date and time a piece of content was downloaded. The content is called “Intro Guide.” I want to store this under conversion information on the Contact in HubSpot.
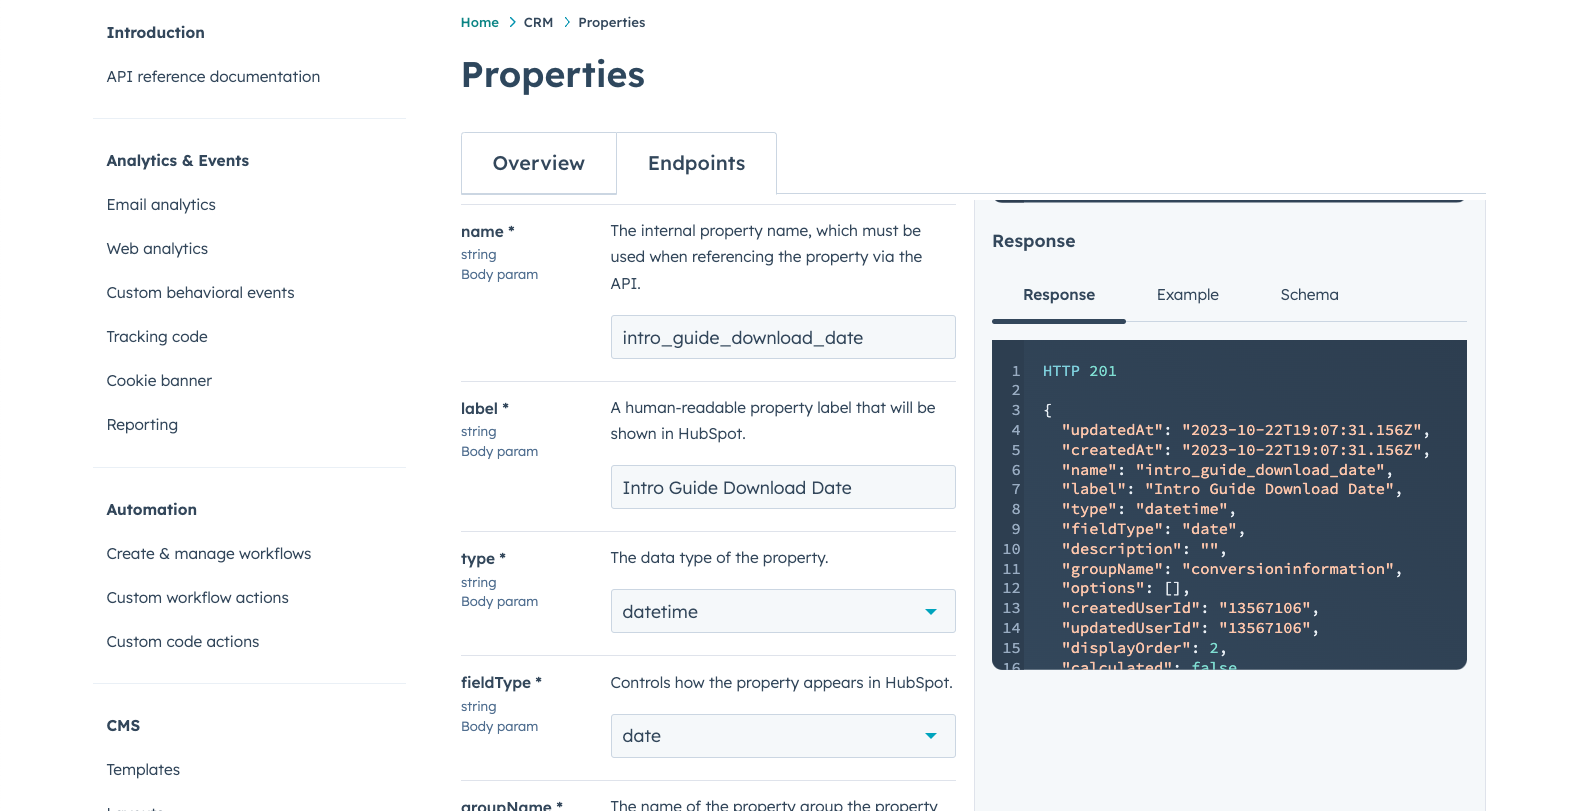
Because this is a datetime property in HubSpot, the Field Type will be date, and the Type will be datetime.
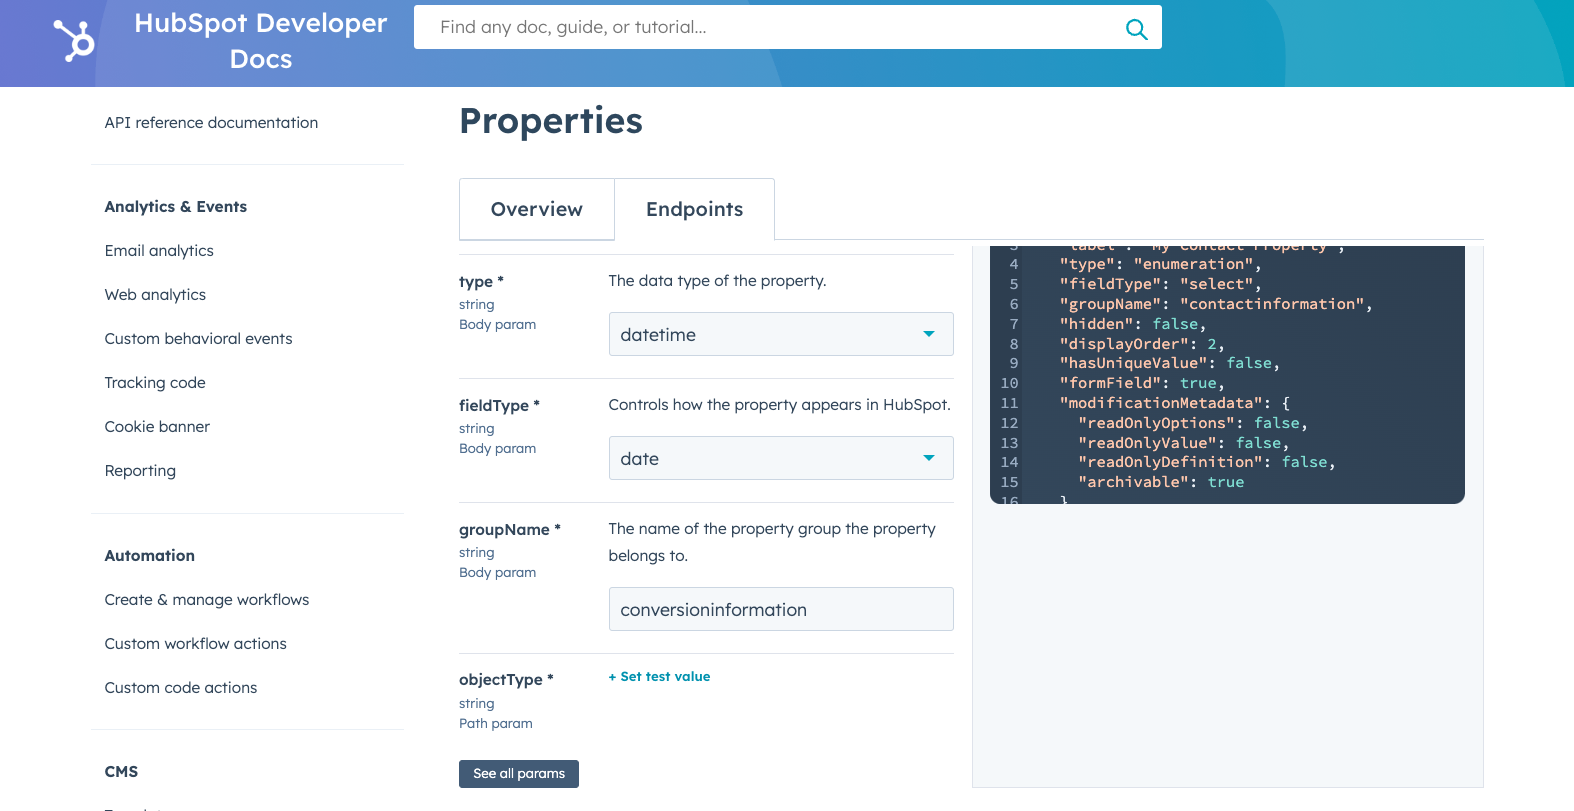
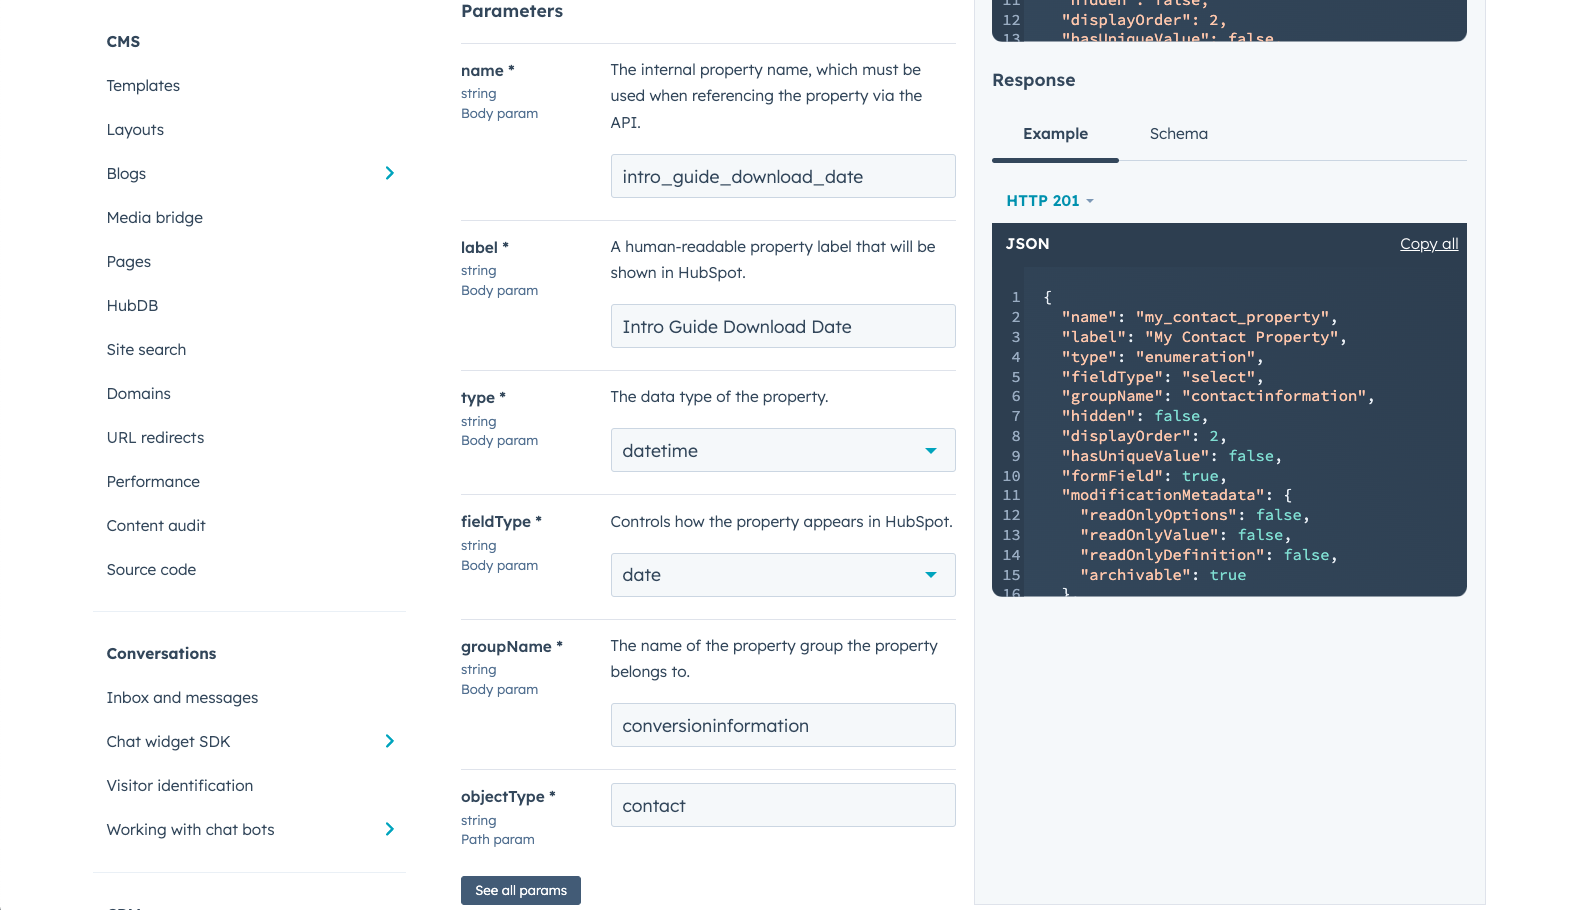
The use case indicated that this property will store the date and time the Intro Guide is downloaded. To make it easy for people to understand what this property is for, let’s set the Name to intro_guide_download_date and the Label to Intro Guide Download Date. If you were to create this as a date property in HubSpot instead of a datetime property in HubSpot, it would look like this.
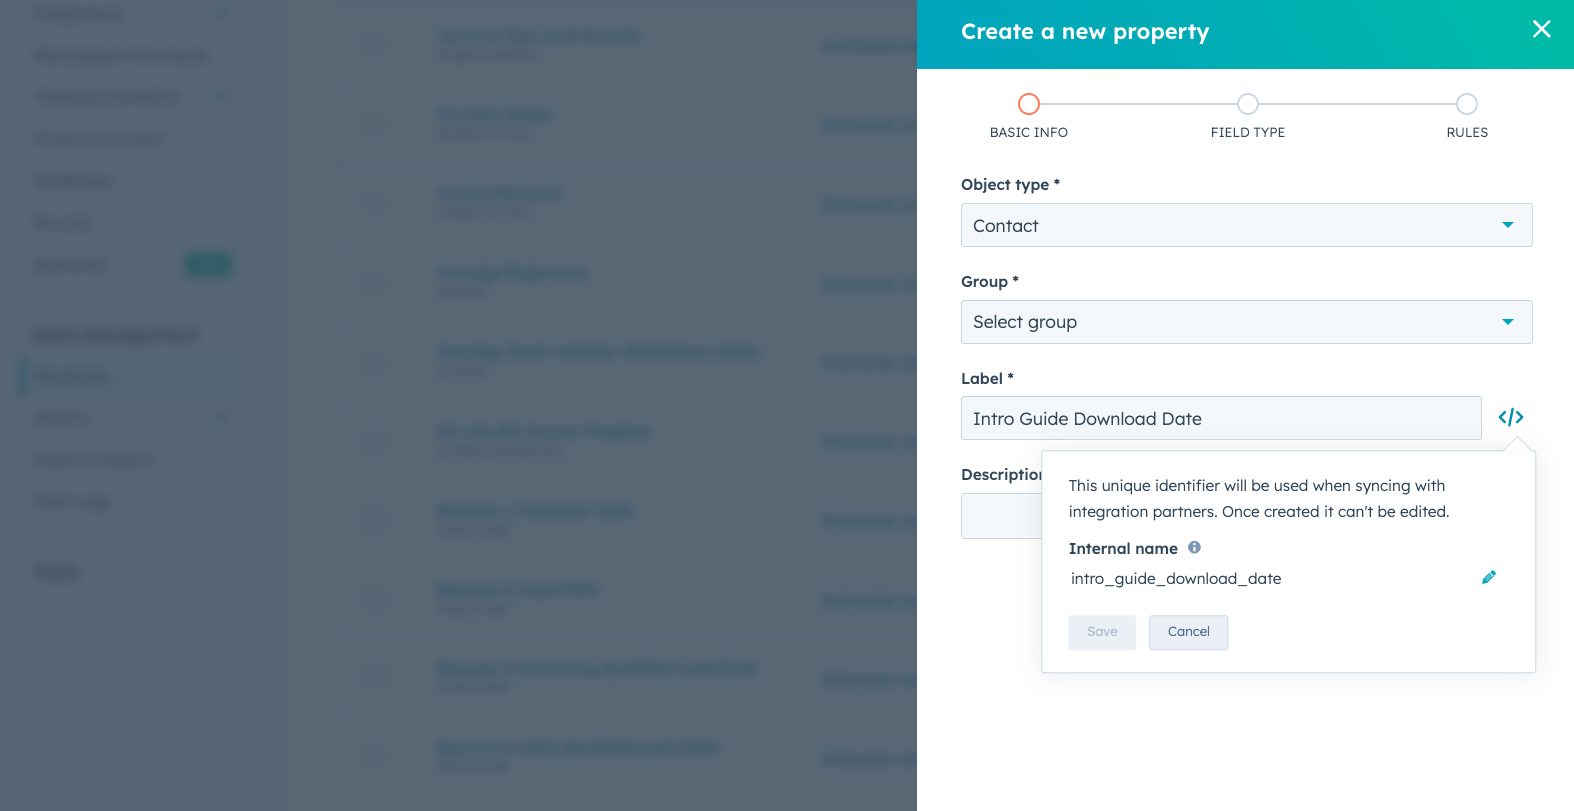
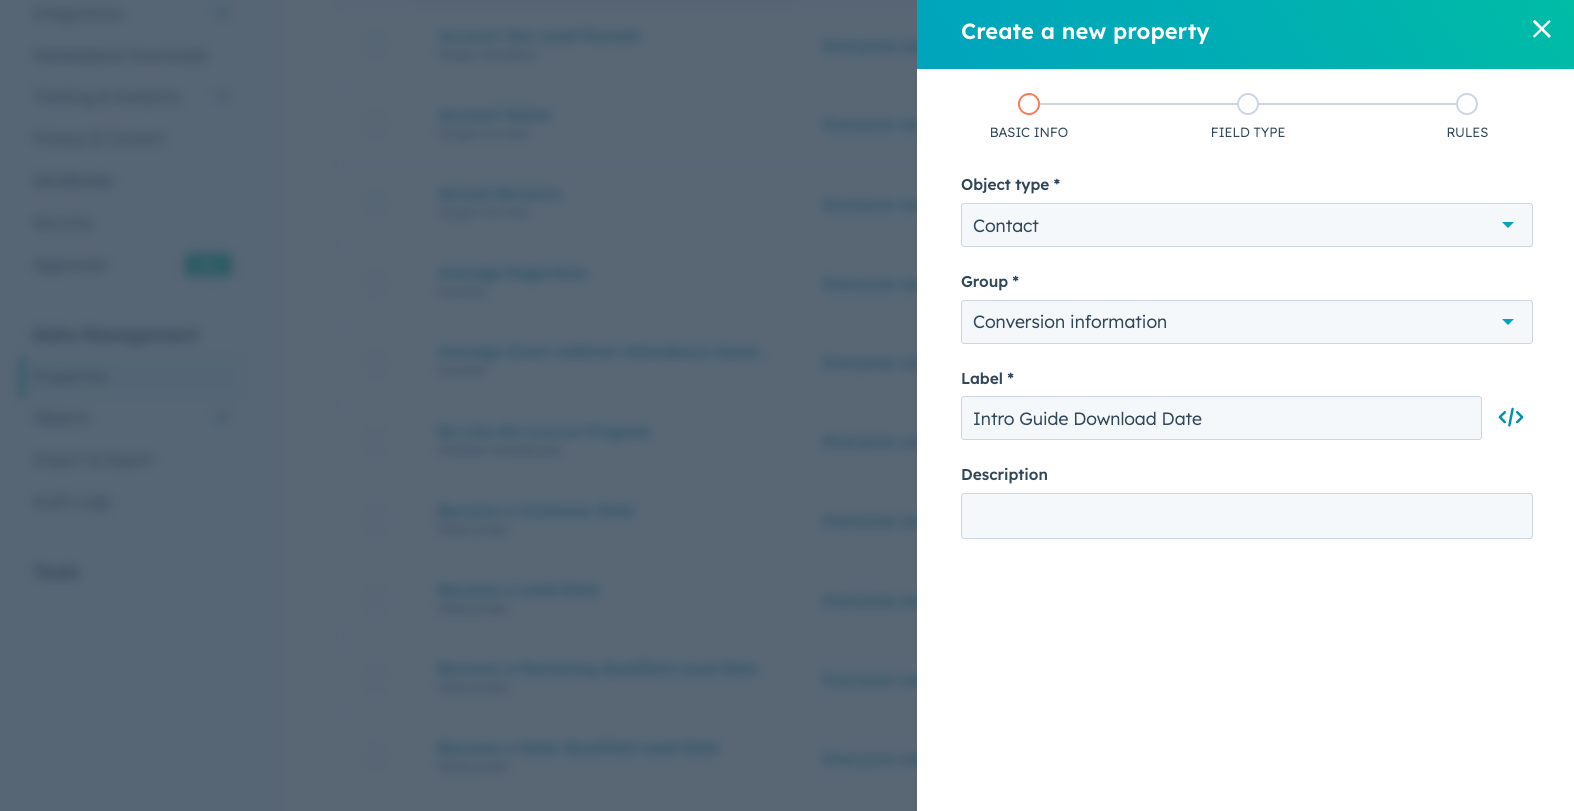
The use case indicated that this is a Contact property, and it should be shown under the conversion information property group in HubSpot. The Group Name will be conversioninformation and the Object Type is Contact.
How to Create a Private App in HubSpot for an App Access Token
The HubSpot API Docs for CRM Properties requires a private app access token to create a new property in HubSpot. To get this access token, create a private app in HubSpot.
Requiring a Private App instead of an Open API allows HubSpot users to limit access to outside applications. When creating the private app, you can provide a granular scope.
To create a custom datetime property on the contact object in HubSpot, create a private app with the crm.schemas.contacts.write scope.
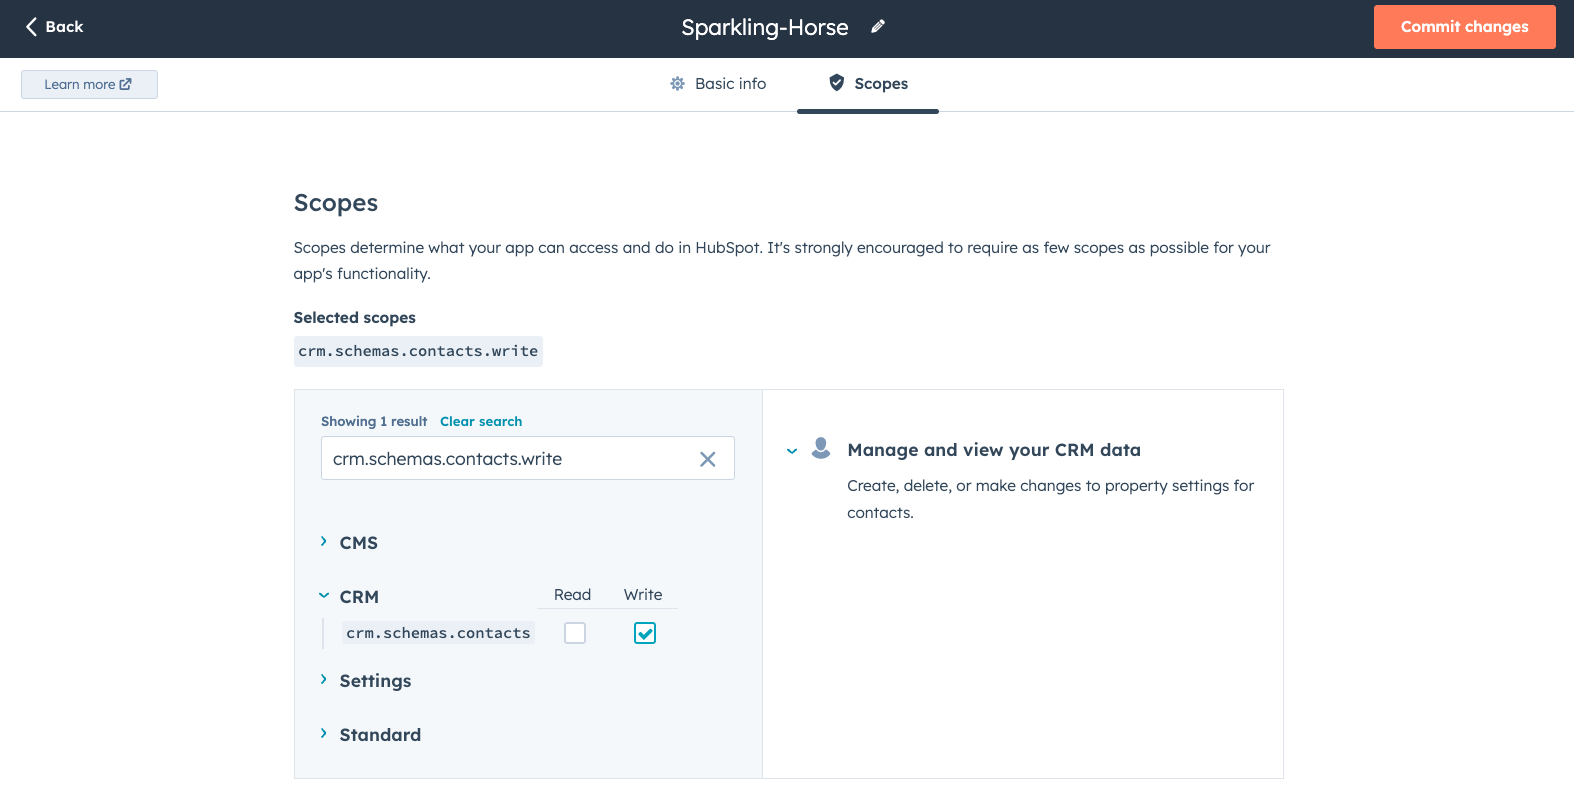
Once the private app is created in HubSpot, navigate to the Auth tab of the private app and click Show Token. Copy the Access Token and head to the API Docs.
How to Create a Custom DateTime Property in HubSpot
Now that you have the data needed to create a custom datetime property in HubSpot and the private app access token, head to the HubSpot API Docs for CRM Properties. Find the Create a Property endpoint.
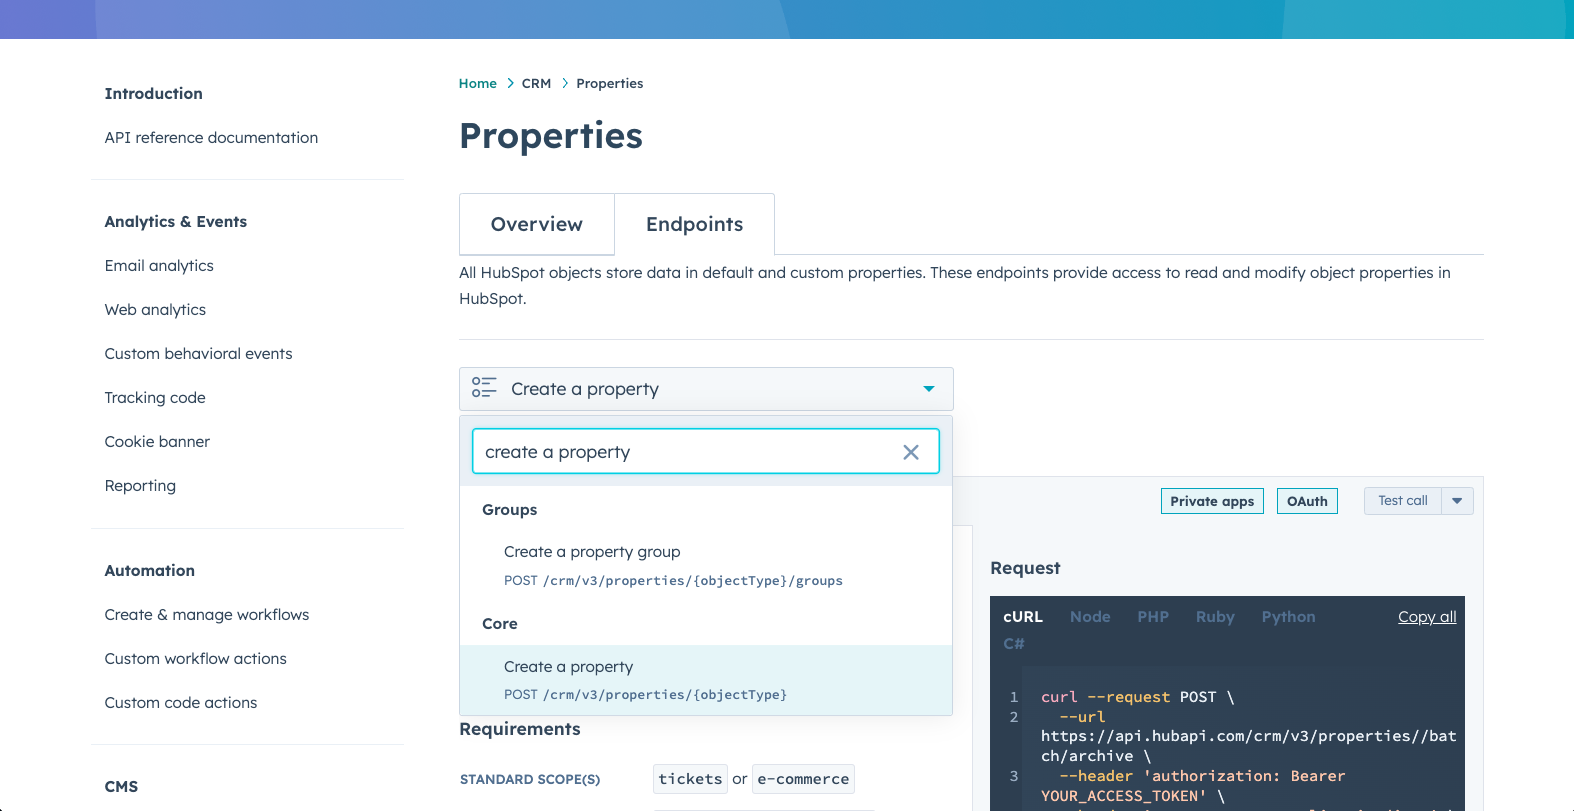
Once you’ve found the endpoint to create a property in HubSpot, input the data you defined in step one. Once you’ve added the data, click the See all params button. By default, HubSpot includes data in the Options section for creating a property. Because we’re creating a datetime property in HubSpot and not a dropdown select property, delete all of the Options fields.
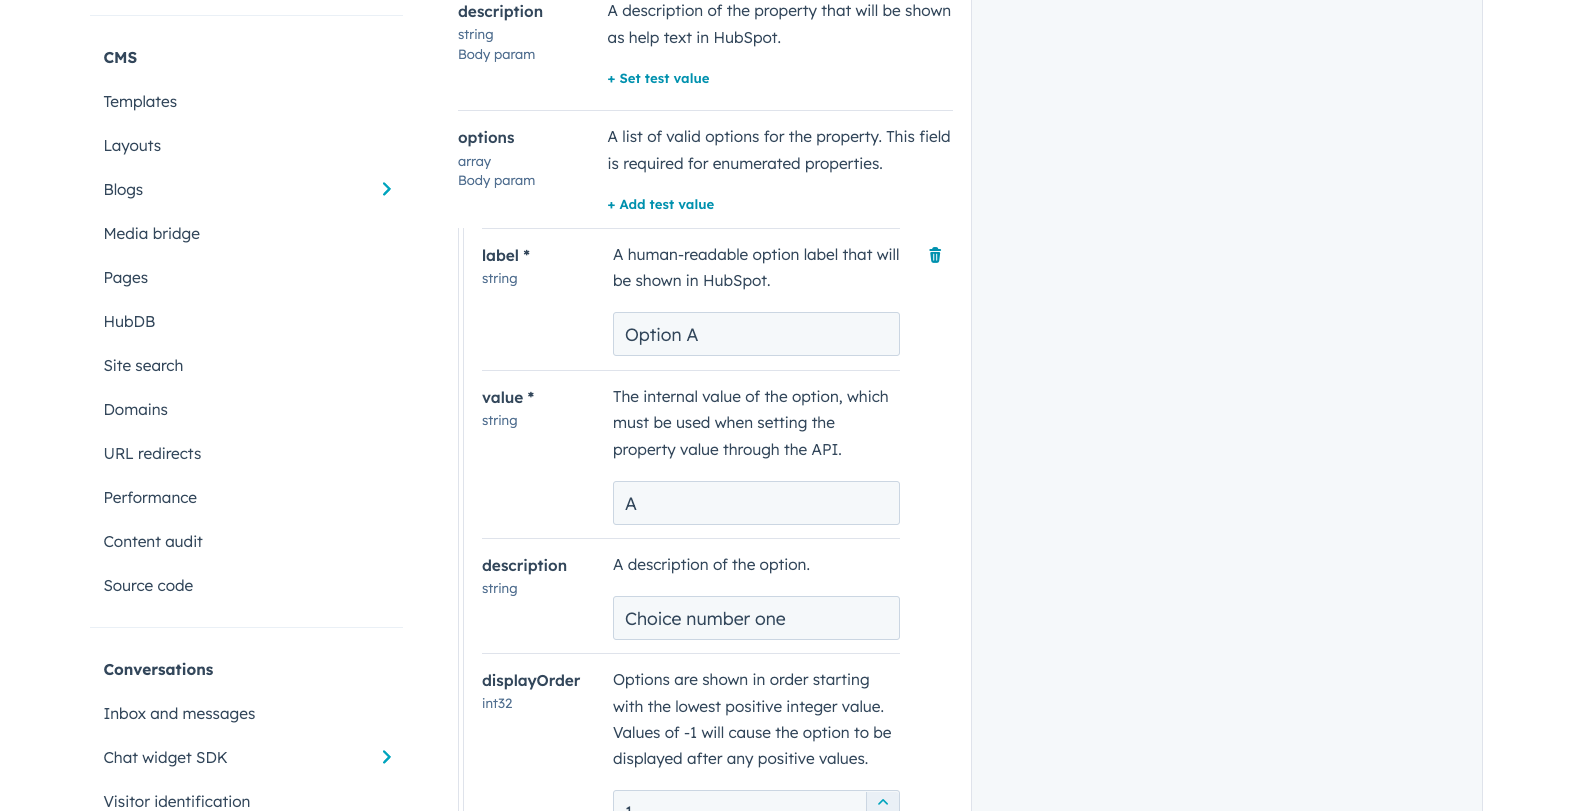
Before sending the property to HubSpot, double-check all of the property values. The example outlined in this article is pictured below. These values are in the correct format and are ready for submission.
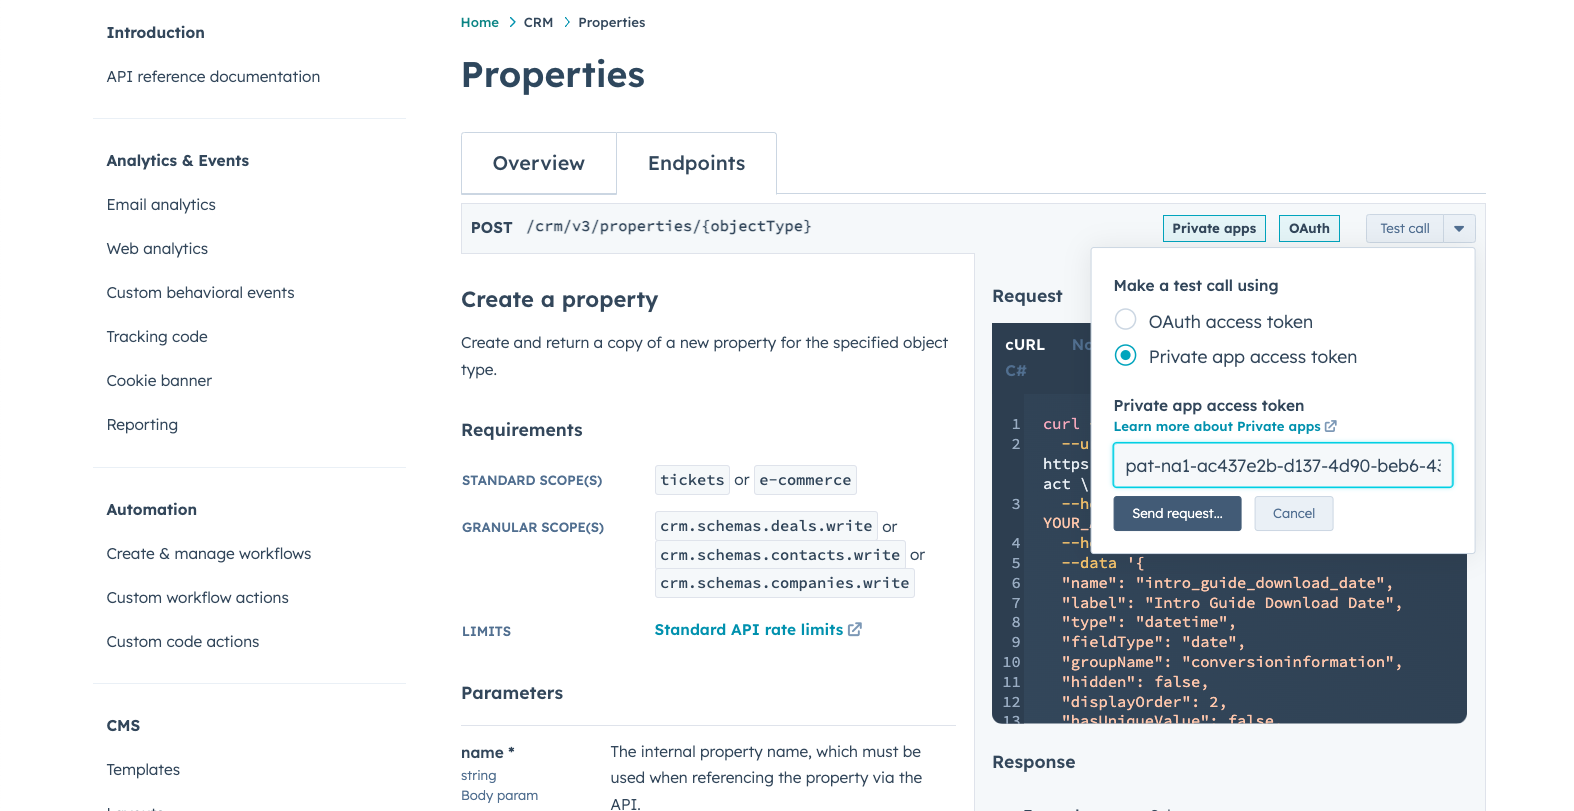
To create the new datetime property in HubSpot, click the down arrow next to Test call in the top right. Select Private app access token and copy the token from the Private App you created in step two. Click send request and confirm request.
Once the request has been sent, scroll down to the Response section. You will see an HTTP 201 response if the property was successfully created. If you do not see an HTTP 201 response, update the errors outlined in the Response section and try again.
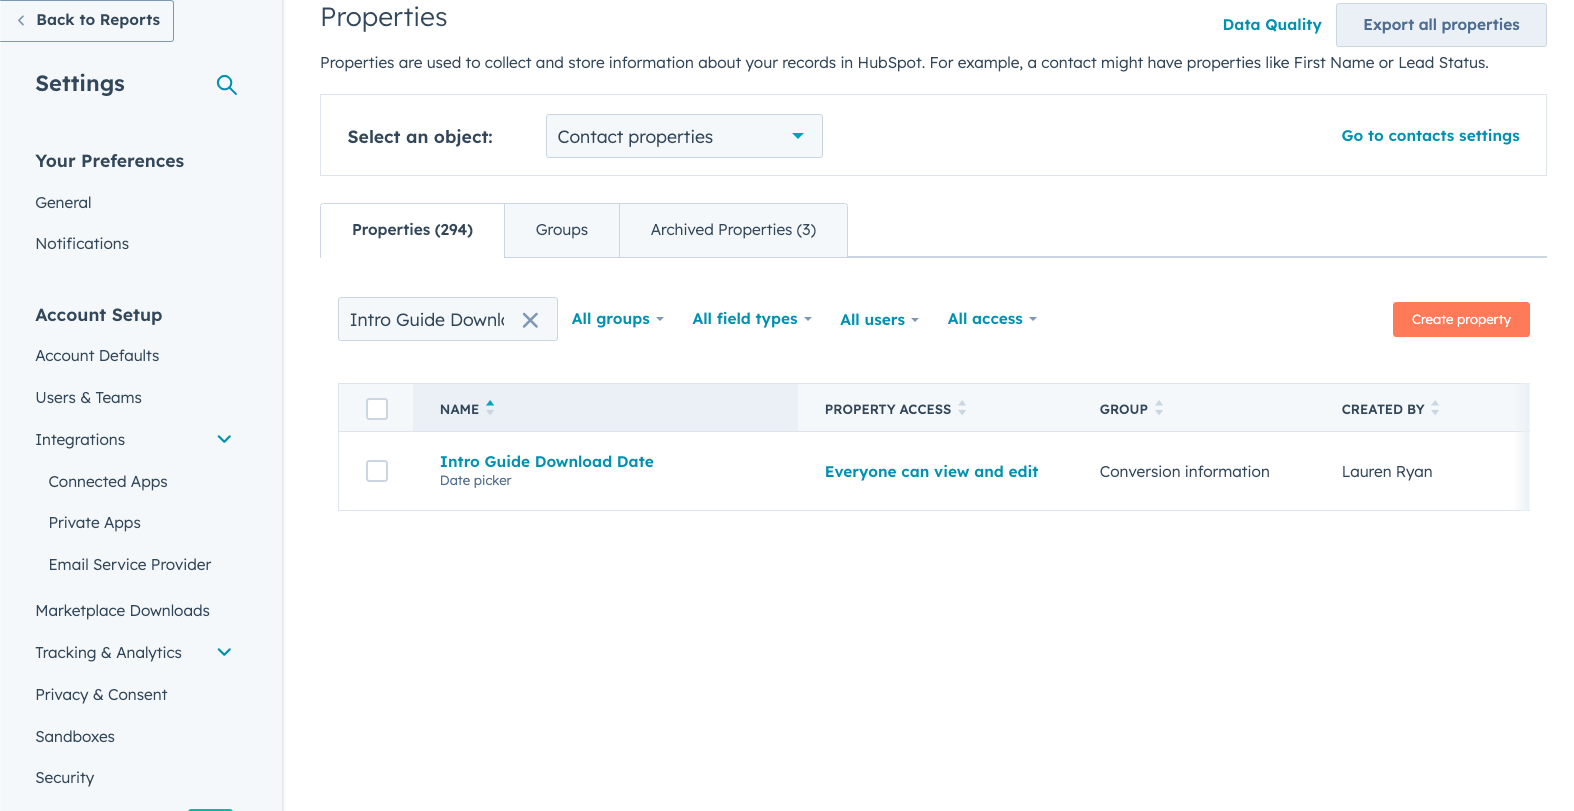
To confirm your property was created, head to HubSpot and search for it. When you find the property in HubSpot, it will show as a date property rather than a datetime property. The HubSpot UI does not show datetime properties, and this is expected. Even though it shows as a date property, it is a datetime property in HubSpot.
In conclusion, while HubSpot does not have a built-in feature to create a datetime property, HubSpot Super Admins can still create one using a private app and the HubSpot API Docs for CRM Properties. By following the three steps outlined in this blog post, you can gather the necessary data and create a custom datetime property to track events with both date and time. This can be particularly useful for storing information like the date and time a piece of content was downloaded, as demonstrated in the example. So, if you're looking to go further than the standard HubSpot date properties, don't let the absence of a datetime property hold you back. Take advantage of the workaround provided here and unlock the full potential of your data in HubSpot.
June 13, 2024 Updates
The UI for the datetime property creation has changed since the original publishing.
Here are a few notes for troubleshooting:
- If you are creating a property for an object other than Contacts, be sure to add the write schema for that object to your private app permissions in HubSpot.
- Display Order needs to be set to 1.
- Referenced Object Type should be cleared.
- Calculation formula should be cleared.
- All external options should be cleared.
Share this
- April 2025 (1)
- March 2025 (1)
- January 2025 (3)
- December 2024 (2)
- September 2024 (2)
- August 2024 (2)
- July 2024 (3)
- June 2024 (1)
- May 2024 (1)
- February 2024 (1)
- January 2024 (1)
- December 2023 (1)
- November 2023 (1)
- October 2023 (5)
- September 2023 (2)
- June 2023 (1)
- April 2023 (2)
- March 2023 (2)
- February 2023 (5)
- January 2023 (8)
- December 2022 (7)
- November 2022 (10)
- October 2022 (2)
- September 2022 (11)
- August 2022 (4)
- July 2022 (2)
- June 2022 (3)
- May 2022 (8)
- April 2022 (6)
- March 2022 (4)
- February 2022 (4)
- January 2022 (6)
- December 2021 (4)
- November 2021 (4)
- October 2021 (4)
- August 2021 (1)
- July 2021 (7)
- June 2021 (15)
- May 2021 (1)
- March 2021 (2)
