Share this
Create & Sync Salesforce State and Country Picklists with HubSpot
by Lauren Ryan on January 2022
Salesforce is a powerful CRM platform, but Salesforce is only as strong as the data and processes built by your Salesforce administrator. A common challenge B2B Salesforce users face is standardizing address inputs for the State and Country fields. Enabling State and Country picklists in Salesforce is the best solution to standardize address data quality.
How to Implement State and Country Picklists in Salesforce
Step 1. Configure State and Country Picklists in Salesforce
- From Setup, enter State and Country/Territory Picklists in the Quick Find box
- Choose State and Country/Territory Picklists
- On the Territory/Country Picklists page, click Enable Picklists
- Click "Edit" for country details to configure the states according to your preference
- On the picklist tab, choose the default territory/country. This action populates the territory country picklist
- Default territories and countries must be visible and active
- To save the configuration, click "Save"
How to Standardize State and Country Picklists in HubSpot
Step 2. Create picklists in HubSpot that match the Salesforce country and state picklists
- In your HubSpot account, navigate to Settings > Properties > Contacts
- Create a drop-down select field for Countries and copy the Country values you have in Salesforce into this field
- Once created, navigate to the Salesforce integration tab by going to Settings > Integrations > Connected Apps > Salesforce > Contacts
- Click "Add new field mapping"
- Sync the new Countries picklist in HubSpot with the Country drop-down field in Salesforce and select Two-Way Sync
Note - Be sure that the internal value in HubSpot for each Country matches the API value in Salesforce. Sometimes, the API value in Salesforce is the ISO code for the country rather than the full country name. If this is the case, the internal value for the options in HubSpot must be the ISO code as well in order to sync.
Step 3. Create state picklists for each country with state options in Salesforce
As you've noticed, not every country has a set of states in Salesforce. But, for the countries that do have a state, we need to ensure the state data syncing through to Salesforce matches the picklist values available for states. But, creating one state picklist in HubSpot for all of the options in Salesforce to include on your HubSpot forms is a poor user experience for your end-user. This next step may seem a bit cumbersome, but it will create the best end-user experience!
- In your HubSpot account, navigate to Settings > Properties > Contacts
- Create a drop-down select field for each country with values for states.
- To find which countries have associated states, navigate to Salesforce > Setup > State and Country/Territory Picklists > Configure States, Countries, and Territories
- Look under the Available States/Provinces column. If you see a number in that column, there are state options for the country.
- Click "Edit" next to the country to see the state values for that country.
- Copy the state values exactly as they appear in Salesforce into the picklist fields created in HubSpot
- Repeat these steps until each country with state values in Salesforce has a unique picklist in HubSpot
Step 4. Build automation to roll up the state picklists into a consolidated field and only sync the consolidated field with Salesforce
- In your HubSpot account, navigate to the Workflow tool
- Create a new Contact Based Workflow from scratch
- Set the Enrollment Trigger to "Countries" is known
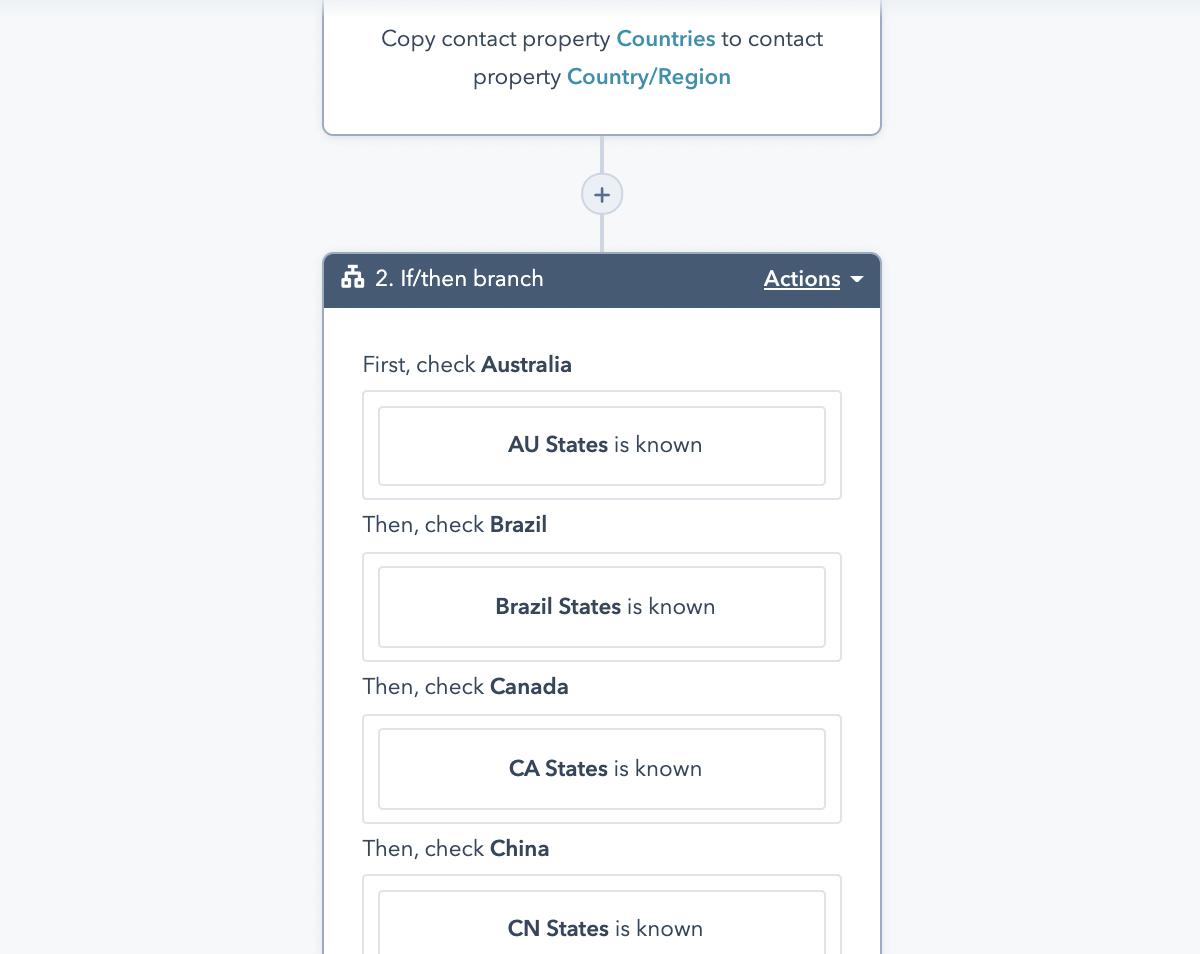
- Add a Workflow Action to "Copy property value" and copy the value in Countries to the property "Country/Region" to keep the default property in sync with Salesforce. You cannot delete the default sync with Salesforce for this field - so it's important to keep the Country/Region field up-to-date.

- Add an If/Then branch Workflow Action and check each state-specific picklist for "Is Known".
- For each branch of the Workflow, add a "Copy property value" Workflow Action to copy the State-Specific picklist value to the roll-up State/Region text field. You cannot delete the default sync with Salesforce for this field - so it's important to keep the State/Region field up-to-date.
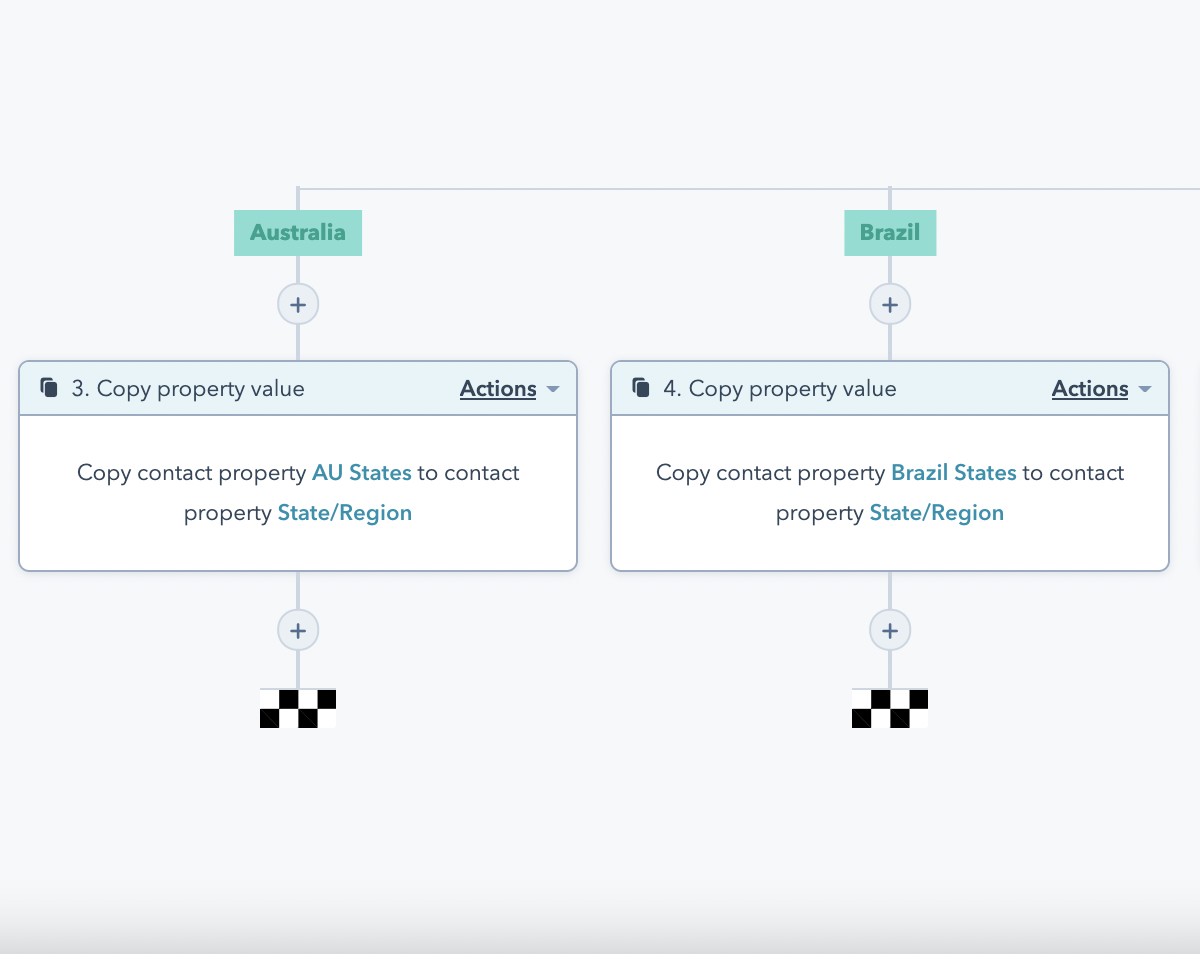
Note - You can only add 20 branches to the If/Then branch Workflow Action. So, for the 50 US states, you will need to add 20 states and then an additional If/Then branch Workflow Action under "None met" and so on until all 50 states are accounted for.
Step 5. Add State and Country Picklists to forms collecting location data in HubSpot
Now that you have your picklists ready for use, it's time to optimize your forms to collect this data for future submissions.
- Navigate to Marketing > Lead Capture > Forms in HubSpot
- Add the Countries picklist you created in place of the Country/Region form you may have been using
- Select the "Logic" tab
- Select a country with a dedicated states dropdown field and put the name of the country in the "Contains any of" search field.
- Under "Then show", select the matching state picklist for the selected country
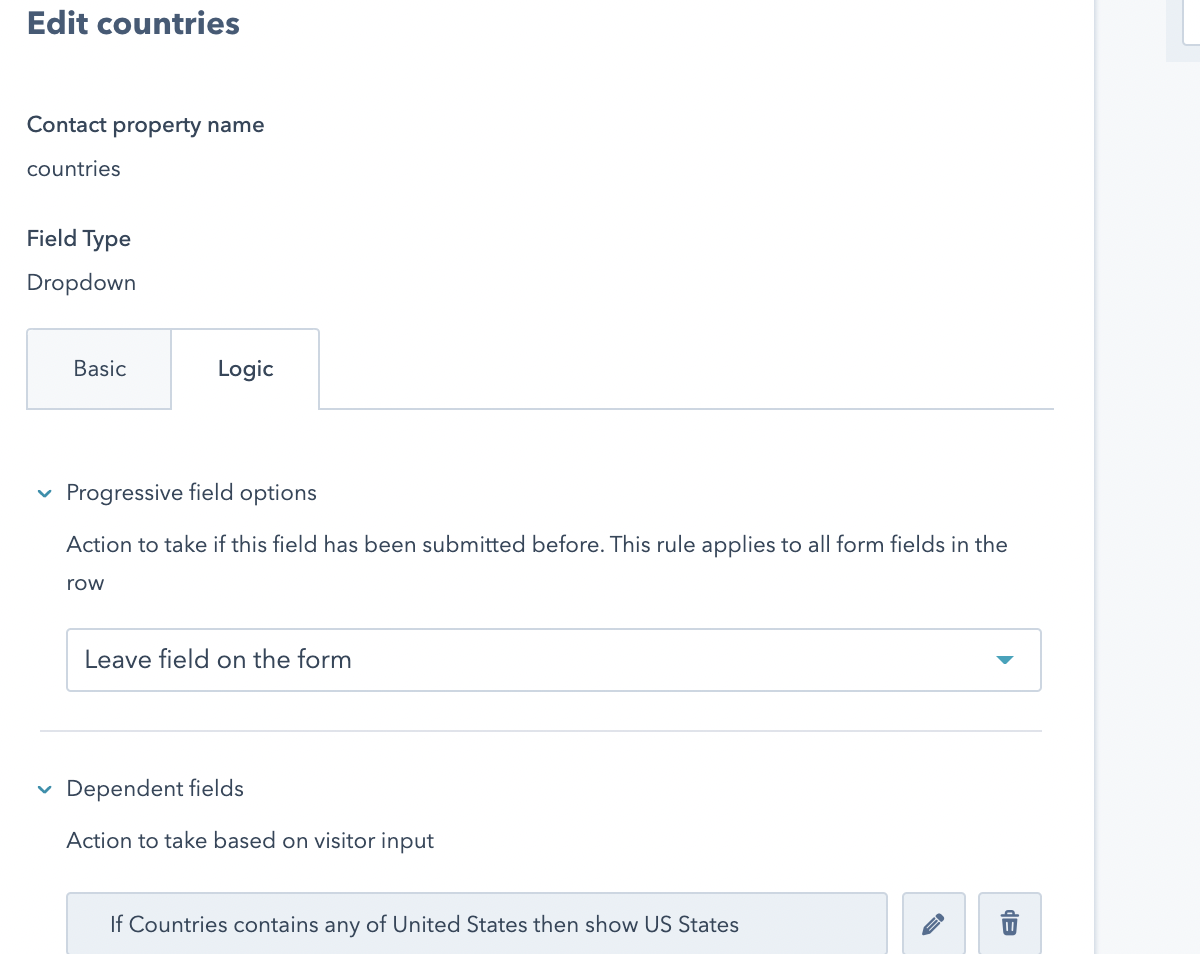
- Once selected, click into the field in the form editor and change the name of the field to "State/Region" so the end-user does not see the country-specific naming convention for the picklist field
- Repeat these steps for each country with a dedicated state picklist until all state picklists are included
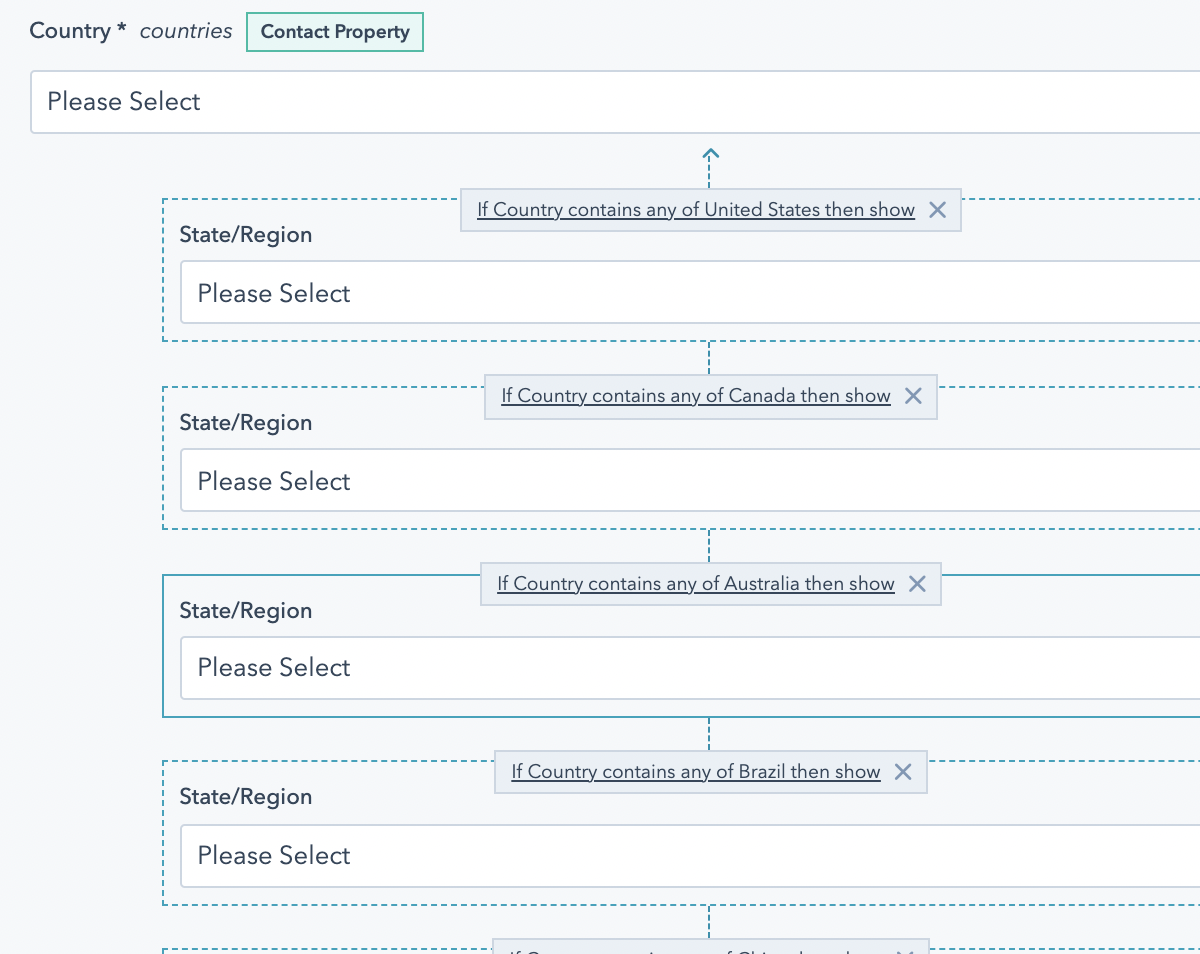
Now, activate your workflow and publish your form! Moving forward, you can clone this form to create future forms so you only need to build the dependencies once.
Let an Expert Do It for You
By integrating Hubspot and Salesforce with the assistance of a skilled consultant, it will be easier to customize your integration to maximize success on each platform. Remember that aligning your sales and marketing systems is the only way to achieve scalable marketing and sales operations.
Enroll now in the first-ever HubSpot Salesforce integration course.
Share this
- April 2025 (1)
- March 2025 (1)
- January 2025 (3)
- December 2024 (2)
- September 2024 (2)
- August 2024 (2)
- July 2024 (3)
- June 2024 (1)
- May 2024 (1)
- February 2024 (1)
- January 2024 (1)
- December 2023 (1)
- November 2023 (1)
- October 2023 (5)
- September 2023 (2)
- June 2023 (1)
- April 2023 (2)
- March 2023 (2)
- February 2023 (5)
- January 2023 (8)
- December 2022 (7)
- November 2022 (10)
- October 2022 (2)
- September 2022 (11)
- August 2022 (4)
- July 2022 (2)
- June 2022 (3)
- May 2022 (8)
- April 2022 (6)
- March 2022 (4)
- February 2022 (4)
- January 2022 (6)
- December 2021 (4)
- November 2021 (4)
- October 2021 (4)
- August 2021 (1)
- July 2021 (7)
- June 2021 (15)
- May 2021 (1)
- March 2021 (2)
